jueves, 4 de junio de 2020

How To Repair A Crashed SD Card And Protect Your Data

One of the many reasons users prefer Android devices is the ability to expand the amount of available storage space using the MicroSD Card. Since we have the ability add up to 256GB of external storage to Android devices today, you're bound to choke up when the SD card crashes without any tell-tale signs.
If you're experiencing issues on how to repair a crashed SD card on your Android device, there are certain fixes you can try out. Since there's not a singular solution to SD Card issues, we've created a guide to help you detect the issue with your external storage and mentioned multiple solutions to get your SD card working and even retrieve your stored data along with it.


Before you start

Don't format the card if you want to retain any of the photos on it. You can follow the tips in our separate article on how to format a write-protected SD card after you've tried to recover any files that are on your card.

Now, try and find a different card reader. If you've inserted an SD card into your laptop or PC's built-in slot and nothing happens, try using a different computer or a USB card reader.
Sometimes it's the reader at fault – not the card. You can buy a USB SD card reader online for just a couple of pounds which will accept both microSD and standard SD cards.

Steps to Repair a Crashed SD Card and Protect your Data:

Step 1 – Physically clean the SD Card

Despite being durable and built to last, SD cards are prone to crashing sometimes due to physical damage. Since you carry your phone around everywhere, some dirt and dust are bound to fill up in the cracks, that can make SD card stop working from time to time.
The first thing you can try to do on how to repair a crashed SD card is physically scrub and clean it.
  • Remove the MicroSD card from your Android device and place it on a clean surface. Make sure that you turn off your phone before pulling out the SD card for safety.
  • Flip the MicroSD card and using a white eraser, gently scrub the gold contact pins of the SD card to get rid of any residual dirt or grime.
  • If you have an alcohol-based cleaning solution or even nail polish remover around, dab it on to the connector pins using a Q-tip and gently rub it.
Once the SD card has dried out, you can plug it back into your Android device and turn it on to see if the solution has worked.


Step 2 – Format the SD Card

If your SD card is being detected by the Android device but you're having trouble accessing the saved files, there's a good chance that the files are corrupt. This could either be due to a particular broken file in the saved storage, or a virus that is causing the issue.
Either way, the only option there is left for you to try out is make the SD card reusable for formatting it.
  • From the home screen of your Android device, head over to the Settings app and then scroll down to find the Storage
  • In the Storage tab, you'll be able to find the Erase SD Card option, so go ahead and select it.
  • Confirm your action to delete all of the files and folders stored on your SD card and this should effectively solve the issue.

Step 3 – Check the SD card compatibility

If you are trying to figure out how to repair a crashed SD card on an older Android device, you might just need to look at the details more carefully. If your SD card fails to be recognized on the mobile device but works with your computer, the problem could be related to compatibility.
  • If the MicroSD card that you are trying to use with your older phone is SDXC version (built for higher transfer speeds), it will not be recognized.
  • Look up the maximum capacity of expandable storage that is supported by your device, since they can vary from starting at 64GB to all the way up to 256GB.

Step 4 – Diagnose the SD card using a PC

If a simple format did not help you solve the SD card problem, you might need a more technical analysis of the issue. To do so, you can plug in your SD card into a computer and use the diagnostic tools to find out the pertaining errors and effectively fix them.
  • Connect your Android mobile device to a computer using a USB cable.
  • Make sure that you connect Android as MSC (Mass storage mode) and not MTP (Media transfer mode). You can do this using the notification menu once you connect the phone to your computer.
  • Launch the Windows Explorer and right click on the SD card driver you see on the screen. In the options menu, choose Properties – Tools – Error Checking and wait for the entire process to complete.
  • The computer will try to update the software for your SD card and fix any errors that are causing it to crash.

Step 5 – Use chkdsk to fix/repair a corrupted SD card without data loss

The "chkdsk" command is your first choice for damaged SD card repair. Requiring no format, it allows you to fix or repair a corrupted SD card and regain access to all your important files on the device. Let's see how it works. (I'm using Windows 7 for this demonstration)
1. Plug in your SD card to your computer with a card reader.
2. Go to the start menu, type in "cmd" in a search bar, hit enter and then you can see something named "cmd. exe" in a list of programs.
3. Right-click "cmd. exe" and then you will get the following command windows that allow you to fix your corrupted SD card without formatting.
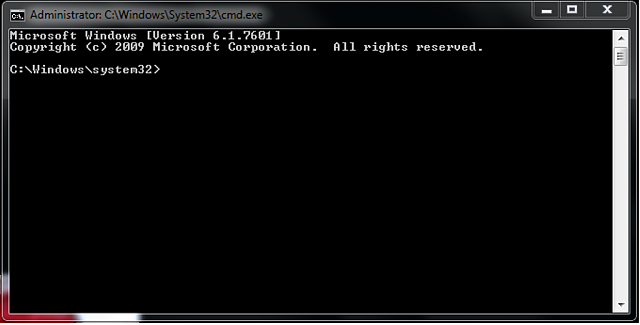
4. Type in "chkdsk /X /f sd card letter:" or "chkdsk sd card letter: /f ", for example,"chkdsk /X /f G:" or "chkdsk h: /f".
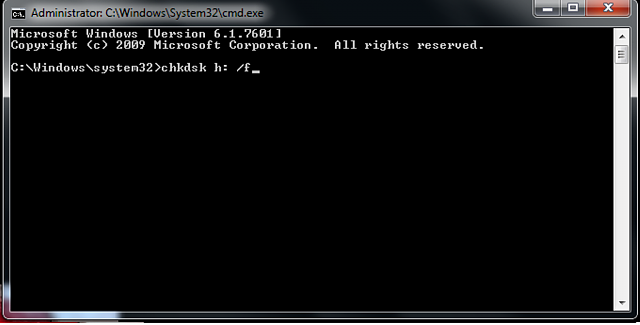
After finishing all the steps, Windows will have checked and fixed the file system of the SD card. It usually takes several minutes. After that, if you see "Windows has made corrections to the file system" in the command window, then congratulations! The damaged SD card is successfully fixed and you can see your data again. If not, you should try a third-party data recovery software to retrieve your files from the damaged SD card and repair it by formatting.
Once the process has been completed, you can go ahead and pop the SD card back into your Android device and see if the issue has been resolved.

Step 6 : Use EaseUS Data Recovery Wizard to recover data from damaged SD card

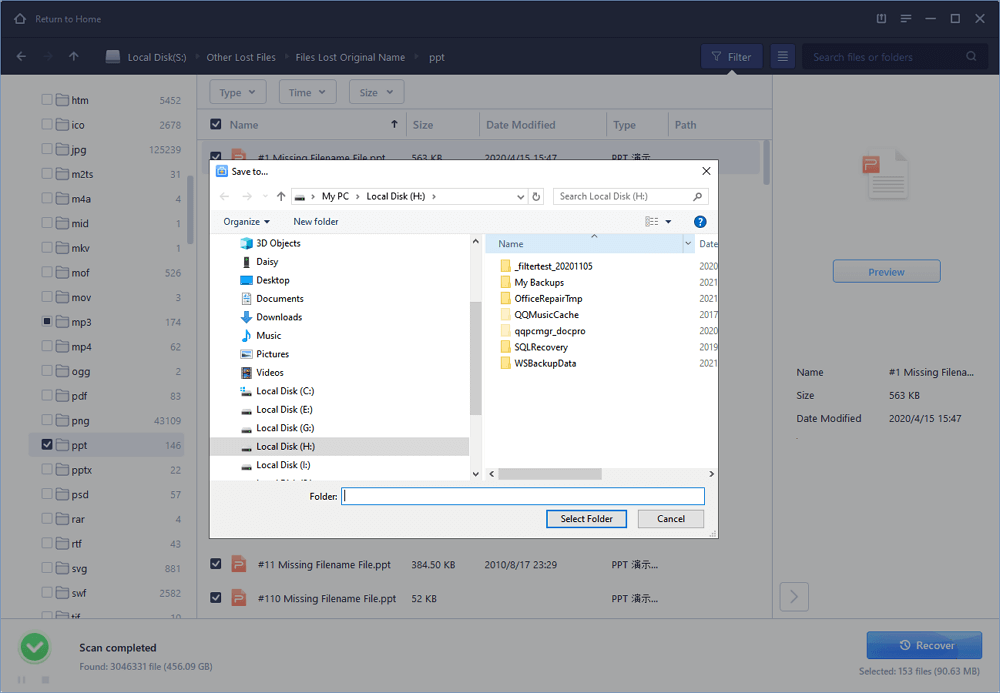
1. Connect the corrupted SD card to your PC, launch EaseUS's data recovery software, select the card and click "Scan".
2. A quick scan will first start to search all the lost and existing data on the SD card. And after that, a deep scan will automatically launch in order to find more files.
3. After the scan, choose those files you want to recover and click the "Recover" button to retrieve them back.
Final Words :

So finally through this article, you have got to know about the method by which the SD card could be repaired and hence the data in it could be saved for the further access. We have tried to present the method in easy to grab manner and we believe that you could possibly get to know about it easily. Hope that you would have liked the information in this post, if it is so then please share it with others. Also, do not forget to share the post with others, let most of the people know about the method. Share your comments about the post through using the comment box below. At last never the fewer thanks for reading this post!

Related articles


  1. Pentest Wiki
  2. Pentestbox
  3. Pentestgeek
  4. Hacking Jacket
  5. Pentest Uk
  6. Hacking Gif
  7. Pentest Linux
  8. Hacking Websites
  9. Pentest Wiki
  10. Pentest Smtp
  11. Hacking Hardware
  12. Hacking Forums
  13. Pentest Standard
  14. Hacking
  15. Pentesting Tools
  16. Hacking 3Ds

miércoles, 3 de junio de 2020

BASICS OF METASPLOIT – BASIC COMMANDS OF METASPLOIT

Metasploit is an advanced hacking tool that comes itself with a complete lack of advanced penetration testing tools. Penetration testers and hackers are taking so much advantage of this tool. It's a complete hack pack for a hacker that he can play almost any attack with it. Here I am going to discuss the basics of Metasploit. I am not covering attacks in this article, as I am just making sure to share the basics of Metasploit and basic commands of Metasploit. So, we can get back to cover attacks of Metasploit in the next articles.

BASICS OF METASPLOIT

The Metasploit framework has three types of working environments.
  1. msfconsole
  2. msfcli interface
  3. msfweb interface
However, the most preferred and used is the 'msfconsole'. It's a very efficient command-line interface that has its own set of commands and system's working environment.
First of all, it's most important to know and understand all the useful commands of Metasploit that are going to be used.

BASIC COMMANDS OF METASPLOIT

Metasploit have a huge number of command that we can use in different type of attacks, but I am just going to share the most used and useful commands here that a beginner can easily understand and follow 'em.
  • help (It will give the basic commands you need to launch an exploit.
  • search (Finds out the keywords in the selected attack method).
  • show exploits (Shows list of an available exploit in the selected option).
  • show payloads (It lists all the payloads available).
  • show options (It helps you to know all the options if you might have forgotten one).
  • info (This is used to get information about any exploit or payload).
  • use (It tells Metasploit to use the exploit with the specified name).
  • set RHOST (Sets the address of specified remote host).
  • set RPORT (Sets up a port that connects to on the remote host).
  • set PAYLOAD (It sets the payload that gives you a shell when a service is exploited).
  • set LPORT (Sets the port number that the payload will open on the server when an exploit is exploited).
  • exploit  (It actually exploits the service).
  • rexploit (Reloads your exploit code and then executes the exploit without restarting the console).
These are the most used Metasploit commands which come in handy in most of the situations during any sort of attack. You must give all the commands a try and understand 'em how it works and then move to the next part of designing an attack.
Related posts

Top 20 Best Free Hacking Apps For Android |2019|

 20 Best Free hacking apps For Android |2019|. 

Android is now one of the most popular operating systems. So, hackers have also started using Android devices for their tasks. Now Android devices are used for penetration testing and other hacking activities including IT security administrator, Wi-Fi hacking and network monitoring. There are several hacking apps or Android devices. So, we have curated a list of best hacking apps for Android.


Before you start using these apps, you must take a backup of your important data. I also recommend the use of these apps on a separate device. Using this on your primary phone is not recommended. It is because many of these apps require a rooted device and app can also harm your phone.


Note: Hacking apps can be used for educational and malicious purpose. But we never encourage malicious operations. We are listing the apps here just for educational purpose. You should only use these apps to learn. We do not support any unethical use of these apps.

1.  AndroRAT

AndroRAT stands for Android RAT. RAT is the short form of Remote Administrative Tool and it allows an attacker to remotely control and fetch information from a device. AndroRAT does the same thing. It has a server developed in Java/Swing but the Android application has been developed in Java Android.

AndroRAT allows you to connect information like call logs, contacts, messages, location and more. You can remotely monitor sent and received messages send texts, use the camera, open a URL in the browser, make phone calls and remotely monitor the device.

The connection to the server can be triggered by an SMS or a call. From the server GUI, you can check all the connected clients and access information.

As the app allows silent remote access, it is not available on Play Store.

                Download APK

2. zANTI

zANTI is a known penetration testing suite of applications you can install locally on Android smartphone. This tool brings scanning tools Diagnostic features and Reporting tools. You can use this malicious software to attack a network and check for any loopholes in your network. This tool is used to test redirect and SSL stripping attacks. You can edit request and response messages from web servers, the host takes websites from your Android phone and more.


                  Download 

3. FaceNiff

FaceNiff is another good Android hacking that allows you to intercept the traffic of your WiFi network. You can use this tool to snoop what people are doing on the network you are. You can snoop on services like Facebook, Twitter, Amazon, YouTube and more. This is one of the notable too for steal cookies from the WiFi network and gives the attacker unauthorized access to other people's account.

This app requires a rooted device. So, you can only use the app if you have a rooted phone.

Download APK

4. Droidsheep

Droidsheep is also a similar app that helps security analysts understand what is happening in your Wi-Fi network. Like Face Sniff, this app can also hijack the web session profiles over a network and supports most of the services and websites.

The primary difference between Droidsheep and FaceSniff is that Droidsheep works with almost all the websites while FaceSniff has limited support.

                     Download APK

5. Hackode

Hackode is another good hacking apps for Android. It is not a single app but a collection of tools for ethical hackers and penetration testers. The app comes with three modules including Reconnaissance, Scanning and Security Feed. You can use this app for SQL Injection, Google hacking, MySQL Server, Whois, Scanning, DNS Dif, DNS lookup, IP, MX Records, Security RSS Feed, Exploits etc.

The app is still in beta, but available in Play Store.

                  Download Here

6. cSploit

cSploit is also a good security tool for Android. It comes with several options like cracking Wi-Fi password, installing backdoors, finding vulnerabilities and their exploits. If you are looking for a good hacking app or hacker app for Android, you should try this one for sure.

                  Download APK

7. DroidBox

DroidBox is also a similar kind of app that allows you to do the dynamic analysis of Android applications. You can use this app to get information like hashes of APK package, network traffic, SMS & phone calls, Incoming/outgoing network data, Listing broadcast receivers and more.

                    Download

8. Nmap

If you are into security or hacking, I am sure you already know the name of this too. Like the desktop tool, Nmap for Android also allows you to scan

It works on both on non-rooted and rooted phones. If you are a beginner, you should try this app and learn from it.

                      Download

9. SSHDroid

SSHDroid is SSH tool developed for Android. It lets you connect to a remote computer and run terminal commands, transfer and edit files. The app also provided features like shared-key authentication, WiFi autostart whitelist, extended notification control etc,

This app is available on Play Store.

                    Download

10. Kali Linux NetHunter

Kali Linux NetHunter is an open source penetration testing platform for Android. It officially supports Nexus and OnePlus devices. It provides the ultimate penetration testing platform that allows you to perform a wide range of attacks.

                     Download

11. APKInspector

APKInspector allows you to perform reverse engineering on an APK. you can use this to get a deep insight or APK and get the source code of any Android app. You can do modifications in the APK and visualize the DEX code to erase the credits and license.

                 Download APK

12. Shark for Root

Shark for Root is an advanced hacking tool for security experts and hackers. It can work as a traffic snipper. You can use the tcpdump command on rooted devices. It works on Wi-Fi, 3G, and FroYo tethered mode.

                    Download

13. dSploit

dSploit is an Android network penetrating testing suit. You can download and install it on your device to perform network security testing. It supports all Android devices running on Android 2.3 Gingerbread or higher. You need to root this phone for using the app. After rooting the phone, you need to download BusyBox from Google Play Store

The app comes with several modules including Port Scanner, Inspector, RouterPWN, Trace, Login Cracker, Packet Forger, Vulnerability Finder, and MITM.

                      Download

14. WPScan

WPScan is a WordPress vulnerability scanner for Android. This app is used to scan WordPress based websites and find possible vulnerabilities. WPScan is a popular desktop tool but this WPScan for Android is not related to that. So, do not think of it as an official WPScan app.

                      Download

15. Network Mapper

Network Mapper is a network scanner tool for network admins. It used to scan the network, lists all devices connected and find Open ports of various servers like FTP servers, SSH servers, SMB servers etc on the network. The tool is available on Play Store.

                     Download

16. Andosid

Andosid is like LOIC for the desktop. This tool is used to perform DOS attacks from Android mobile phones. You can use this tool to set a target URL and perform a DOS attack in one click. The tool will start flooding target URL with fake requests.

                     Download

17. DroidSQLi

DroidSQLi app allows attackers to perform SQL Injection on a target URL. You just need to find a target URL and this tool will start the fully automated SQL Injection attack.

                     Download

18. AppUse

AppUse is a Virtual Machine developed by AppSec Labs. It is a freely available mobile application security testing platform that comes with lots of custom made tools by AppSec Labs. If you want to sue your Android phone as your penetration testing tool, this one is for you.

                   Download

19. Network Spoofer

Network Spoofer is also a good hacking app for android. It lets you change the website on other people's computer from your Android phone. Connect to a WiFI network and then choose a spoof to use with the app. this tool is to demonstrate how vulnerable a network is. Do not try this on any unauthorized networks.

                 Download

20. DroidSheep Guard

As the name suggests, DroidSheep Guard works against DroidSheep. It monitors Android devices' ARP-table and tries to detect ARP-Spoofing attack on your network. It does not require a rooted device.

               Download


@EVERYTHING NT


Related news


Practical Bleichenbacher Attacks On IPsec IKE

We found out that reusing a key pair across different versions and modes of IPsec IKE can lead to cross-protocol authentication bypasses, enabling the impersonation of a victim host or network by attackers. These vulnerabilities existed in implementations by Cisco, Huawei, and others.

This week at the USENIX Security conference, I will present our research paper on IPsec attacks: The Dangers of Key Reuse: Practical Attacks on IPsec IKE written by Martin Grothe, Jörg Schwenk, and me from Ruhr University Bochum as well as Adam Czubak and Marcin Szymanek from the University of Opole [alternative link to the paper]. This blog post is intended for people who like to get a comprehensive summary of our findings rather than to read a long research paper.

IPsec and Internet Key Exchange (IKE)

IPsec enables cryptographic protection of IP packets. It is commonly used to build VPNs (Virtual Private Networks). For key establishment, the IKE protocol is used. IKE exists in two versions, each with different modes, different phases, several authentication methods, and configuration options. Therefore, IKE is one of the most complex cryptographic protocols in use.

In version 1 of IKE (IKEv1), four authentication methods are available for Phase 1, in which initial authenticated keying material is established: Two public key encryption based methods, one signature based method, and a PSK (Pre-Shared Key) based method.

Attacks on IKE implementations

With our attacks we can impersonate an IKE device: If the attack is successful, we share a set of (falsely) authenticated symmetric keys with the victim device, and can successfully complete the handshake – this holds for both IKEv1 and IKEv2. The attacks are based on Bleichenbacher oracles in the IKEv1 implementations of four large network equipment manufacturers: Cisco, Huawei, Clavister, and ZyXEL. These Bleichenbacher oracles can also be used to forge digital signatures, which breaks the signature based IKEv1 and IKEv2 variants. Those who are unfamiliar with Bleichenbacher attacks may read this post by our colleague Juraj Somorovsky for an explanation.

The affected hardware test devices by Huawei, Cisco, and ZyXEL in our network lab.

We show that the strength of these oracles is sufficient to break all handshake variants in IKEv1 and IKEv2 (except those based on PSKs) when given access to powerful network equipment. We furthermore demonstrate that key reuse across protocols as implemented in certain network equipment carries high security risks.

We additionally show that both PSK based modes can be broken with an offline dictionary attack if the PSK has low entropy. Such an attack was previously only documented for one of those modes (edit: see this comment). We thus show attacks against all authentication modes in both IKEv1 and IKEv2 under reasonable assumptions.

The relationship between IKEv1 Phase 1, Phase 2, and IPsec ESP. Multiple simultaneous Phase 2 connections can be established from a single Phase 1 connection. Grey parts are encrypted, either with IKE derived keys (light grey) or with IPsec keys (dark grey). The numbers at the curly brackets denote the number of messages to be exchanged in the protocol.

Where's the bug?

The public key encryption (PKE) based authentication mode of IKE requires that both parties exchanged their public keys securely beforehand (e. g. with certificates during an earlier handshake with signature based authentication). RFC 2409 advertises this mode of authentication with a plausibly deniable exchange to raise the privacy level. In this mode, messages three and four of the handshake exchange encrypted nonces and identities. They are encrypted using the public key of the respective other party. The encoding format for the ciphertexts is PKCS #1 v1.5.

Bleichenbacher attacks are adaptive chosen ciphertext attacks against RSA-PKCS #1 v1.5. Though the attack has been known for two decades, it is a common pitfall for developers. The mandatory use of PKCS #1 v1.5 in the PKE authentication methods raised suspicion of whether implementations resist Bleichenbacher attacks.

PKE authentication is available and fully functional in Cisco's IOS operating system. In Clavister's cOS and ZyXEL's ZyWALL USG devices, PKE is not officially available. There is no documentation and no configuration option for it and it is therefore not fully functional. Nevertheless, these implementations processed messages using PKE authentication in our tests.

Huawei implements a revised mode of the PKE mode mentioned in the RFC that saves one private key operation per peer (we call it RPKE mode). It is available in certain Huawei devices including the Secospace USG2000 series.

We were able to confirm the existence of Bleichenbacher oracles in all these implementations. Here are the CVE entries and security advisories by the vendors (I will add links once they are available):
On an abstract level, these oracles work as follows: If we replace the ciphertext of the nonce in the third handshake message with a modified RSA ciphertext, the responder will either indicate an error (Cisco, Clavister, and ZyXEL) or silently abort (Huawei) if the ciphertext is not PKCS #1 v1.5 compliant. Otherwise, the responder continues with the fourth message (Cisco and Huawei) or return an error notification with a different message (Clavister and ZyXEL) if the ciphertext is in fact PKCS #1 v1.5 compliant. Each time we learn that the ciphertext was valid, we can advance the Bleichenbacher attack one more step.

A Bleichenbacher Attack Against PKE

If a Bleichenbacher oracle is discovered in a TLS implementation, then TLS-RSA is broken since one can compute the Premaster Secret and the TLS session keys without any time limit on the usage of the oracle. For IKEv1, the situation is more difficult: Even if there is a strong Bleichenbacher oracle in PKE and RPKE mode, our attack must succeed within the lifetime of the IKEv1 Phase 1 session, since a Diffie-Hellman key exchange during the handshake provides an additional layer of security that is not present in TLS-RSA. For example, for Cisco this time limit is currently fixed to 60 seconds for IKEv1 and 240 seconds for IKEv2.

To phrase it differently: In TLS-RSA, a Bleichenbacher oracle allows to perform an ex post attack to break the confidentiality of the TLS session later on, whereas in IKEv1 a Bleichenbacher oracle only can be used to perform an online attack to impersonate one of the two parties in real time.

Bleichenbacher attack against IKEv1 PKE based authentication.

The figure above depicts a direct attack on IKEv1 PKE:
  1. The attackers initiate an IKEv1 PKE based key exchange with Responder A and adhere to the protocol until receiving the fourth message. They extract the encrypted nonce from this message, and record the other public values of the handshake.
  2. The attackers keep the IKE handshake with Responder A alive as long as the responder allows. For Cisco and ZyXEL we know that handshakes are cancelled after 60 seconds, Clavister and Huawei do so after 30 seconds.
  3. The attackers initiate several parallel PKE based key exchanges to Responder B.
    • In each of these exchanges, they send and receive the first two messages according to the protocol specifications.
    • In the third message, they include a modified version of the encrypted nonce according to the the Bleichenbacher attack methodology.
    • They wait until they receive an answer or they can reliably determine that this message will not be sent (timeout or reception of a repeated second handshake message).
  4. After receiving enough answers from Responder B, the attackers can compute the plaintext of the nonce.
  5. The attackers now have all the information to complete the key derivation and the handshake. They thus can impersonate Responder B to Responder A.

Key Reuse

Maintaining individual keys and key pairs for each protocol version, mode, and authentication method of IKE is difficult to achieve in practice. It is oftentimes simply not supported by implementations. This is the case with the implementations by Clavister and ZyXEL, for example. Thus, it is common practice to have only one RSA key pair for the whole IKE protocol family. The actual security of the protocol family in this case crucially depends on its cross-ciphersuite and cross-version security. In fact, our Huawei test device reuses its RSA key pair even for SSH host identification, which further exposes this key pair.

A Cross-Protocol Version Attack with Digital Signature Based Authentication

Signature Forgery Using Bleichenbacher's Attack

It is well known that in the case of RSA, performing a decryption and creating a signature is mathematically the same operation. Bleichenbacher's original paper already mentioned that the attack could also be used to forge signatures over attacker-chosen data. In two papers that my colleagues at our chair have published, this has been exploited for attacks on XML-based Web Services, TLS 1.3, and Google's QUIC protocol. The ROBOT paper used this attack to forge a signature from Facebook's web servers as proof of exploitability.

IKEv2 With Digital Signatures

Digital signature based authentication is supported by both IKEv1 and IKEv2. We focus here on IKEv2 because on Cisco routers, an IKEv2 handshake may take up to four minutes. This more relaxed timer compared to IKEv1 makes it an interesting attack target.

I promised that this blogpost will only give a comprehensive summary, therefore I am skipping all the details about IKEv2 here. It is enough to know that the structure of IKEv2 is fundamentally different from IKEv1.

If you're familiar with IT-security, then you will believe me that if digital signatures are used for authentication, it is not particularly good if an attacker can get a signature over attacker chosen data. We managed to develop an attack that exploits an IKEv1 Bleichenbacher oracle at some peer A to get a signature that can be used to break the IKEv2 authentication at another peer B. This requires that peer A reuses its key pair for IKEv2 also for IKEv1. For the details, please read our paper [alternative link to the paper].

Evaluation and Results

For testing the attack, we used a Cisco ASR 1001-X router running IOS XE in version 03.16.02.S with IOS version 15.5(3)S2. Unfortunately, Cisco's implementation is not optimized for throughput. From our observations we assume that all cryptographic calculations for IKE are done by the device's CPU despite it having a hardware accelerator for cryptography. One can easily overload the device's CPU for several seconds with a standard PC bursting handshake messages, even with the default limit for concurrent handshakes. And even if the CPU load is kept below 100 %, we nevertheless observed packet loss.

For the decryption attack on Cisco's IKEv1 responder, we need to finish the Bleichenbacher attack in 60 seconds. If the public key of our ASR 1001-X router is 1024 bits long, we measured an average of 850 responses to Bleichenbacher requests per second. Therefore, an attack must succeed with at most 51,000 Bleichenbacher requests.

But another limit is the management of Security Associations (SAs). There is a global limit of 900 Phase 1 SAs under negotiation per Cisco device in the default configuration. If this number is exceeded, one is blocked. Thus, one cannot start individual handshakes for each Bleichenbacher request to issue. Instead, SAs have to be reused as long as their error counter allows. Furthermore, establishing SAs with Cisco IOS is really slow. During the attack, the negotiations in the first two messages of IKEv1 require more time than the actual Bleichenbacher attack.

We managed to perform a successful decryption attack against our ASR 1001-X router with approximately 19,000 Bleichenbacher requests. However, due to the necessary SA negotiations, the attack took 13 minutes.

For the statistics and for the attack evaluation of digital signature forgery, we used a simulator with an oracle that behaves exactly as the ones by Cisco, Clavister, and ZyXEL. We found that about 26% of attacks against IKEv1 could be successful based on the cryptographic performance of our Cisco device. For digital signature forgery, about 22% of attacks could be successful under the same assumptions.

Note that (without a patched IOS), only non-cryptographic performance issues prevented a succesful attack on our Cisco device. There might be faster devices that do not suffer from this. Also note that a too slow Bleichenbacher attack does not permanently lock out attackers. If a timeout occurs, they can just start over with a new attack using fresh values hoping to require fewer requests. If the victim has deployed multiple responders sharing one key pair (e. g. for load balancing), this could also be leveraged to speed up an attack.

Responsible Disclosure

We reported our findings to Cisco, Huawei, Clavister, and ZyXEL. Cisco published fixes with IOS XE versions 16.3.6, 16.6.3, and 16.7.1. They further informed us that the PKE mode will be removed with the next major release.

Huawei published firmware version V300R001C10SPH702 for the Secospace USG2000 series that removes the Bleichenbacher oracle and the crash bugs we identified. Customers who use other affected Huawei devices will be contacted directly by their support team as part of a need-to-know strategy.

Clavister removed the vulnerable authentication method with cOS version 12.00.09. ZyXEL responded that our ZyWALL USG 100 test device is from a legacy model series that is end-of-support. Therefore, these devices will not receive a fix. For the successor models, the patched firmware version ZLD 4.32 (Release Notes) is available.

FAQs

  • Why don't you have a cool name for this attack?
    The attack itself already has a name, it's Bleichenbacher's attack. We just show how Bleichenbacher attacks can be applied to IKE and how they can break the protocol's security. So, if you like, call it IPsec-Bleichenbacher or IKE-Bleichenbacher.
  • Do you have a logo for the attack?
    No.
  • My machine was running a vulnerable firmware. Have I been attacked?
    We have no indication that the attack was ever used in the wild. However, if you are still concerned, check your logs. The attack is not silent. If your machine was used for a Bleichenbacher attack, there should be many log entries about decryption errors. If your machine was the one that got tricked (Responder A in our figures), then you could probably find log entries about unfinished handshake attempts.
  • Where can I learn more?
    First of all, you can read the paper [alternative link to the paper]. Second, you can watch the presentation, either live at the conference or later on this page.
  • What else does the paper contain?
    The paper contains a lot more details than this blogpost. It explains all authentication methods including IKEv2 and it gives message flow diagrams of the protocols. There, we describe a variant of the attack that uses the Bleichenbacher oracles to forge signatures to target IKEv2. Furthermore, we describe the quirks of Huawei's implementation including crash bugs that could allow for Denial-of-Service attacks. Last but not least, it describes a dictionary attack against the PSK mode of authentication that is covered in a separate blogpost.

Media Coverage, Blogs, and more

English

German

Related articles

  1. Hacker Anonymous
  2. Pentest Online Course
  3. Pentest Process
  4. Pentest Reporting Tool
  5. Pentest Nmap
  6. Hacking Images
  7. Pentester Academy
  8. Pentest Plus

How Do I Get Started With Bug Bounty ?

How do I get started with bug bounty hunting? How do I improve my skills?


These are some simple steps that every bug bounty hunter can use to get started and improve their skills:

Learn to make it; then break it!
A major chunk of the hacker's mindset consists of wanting to learn more. In order to really exploit issues and discover further potential vulnerabilities, hackers are encouraged to learn to build what they are targeting. By doing this, there is a greater likelihood that hacker will understand the component being targeted and where most issues appear. For example, when people ask me how to take over a sub-domain, I make sure they understand the Domain Name System (DNS) first and let them set up their own website to play around attempting to "claim" that domain.

Read books. Lots of books.
One way to get better is by reading fellow hunters' and hackers' write-ups. Follow /r/netsec and Twitter for fantastic write-ups ranging from a variety of security-related topics that will not only motivate you but help you improve. For a list of good books to read, please refer to "What books should I read?".

Join discussions and ask questions.
As you may be aware, the information security community is full of interesting discussions ranging from breaches to surveillance, and further. The bug bounty community consists of hunters, security analysts, and platform staff helping one and another get better at what they do. There are two very popular bug bounty forums: Bug Bounty Forum and Bug Bounty World.

Participate in open source projects; learn to code.
Go to https://github.com/explore or https://gitlab.com/explore/projects and pick a project to contribute to. By doing so you will improve your general coding and communication skills. On top of that, read https://learnpythonthehardway.org/ and https://linuxjourney.com/.

Help others. If you can teach it, you have mastered it.
Once you discover something new and believe others would benefit from learning about your discovery, publish a write-up about it. Not only will you help others, you will learn to really master the topic because you can actually explain it properly.

Smile when you get feedback and use it to your advantage.
The bug bounty community is full of people wanting to help others so do not be surprised if someone gives you some constructive feedback about your work. Learn from your mistakes and in doing so use it to your advantage. I have a little physical notebook where I keep track of the little things that I learnt during the day and the feedback that people gave me.


Learn to approach a target.
The first step when approaching a target is always going to be reconnaissance — preliminary gathering of information about the target. If the target is a web application, start by browsing around like a normal user and get to know the website's purpose. Then you can start enumerating endpoints such as sub-domains, ports and web paths.

A woodsman was once asked, "What would you do if you had just five minutes to chop down a tree?" He answered, "I would spend the first two and a half minutes sharpening my axe."
As you progress, you will start to notice patterns and find yourself refining your hunting methodology. You will probably also start automating a lot of the repetitive tasks.

Related links


OWASP ZAP Project - Zed Attack Proxy Team Releases Two Initiatives

The Zed Attack Proxy team is pleased to announce two recently released initiatives:


ZAP In Ten

The team have just launched a new series of videos called 'ZAP in Ten' in conjunction with AllDayDevOps.

ZAP in Ten is a series of short form videos featuring Simon Bennetts, project lead of the OWASP Zed Attack Proxy (ZAP)  project. Each video highlights a specific feature or resource for ZAP.

ZAP API Docs

As part of OWASP's participation in Google's Season of Docs, the ZAP project has had @sshniro working on API documentation. The first iteration of the documentation is now live.  It includes Java, Python, and shell example snippets all presented in a responsive and accessible design. Which we will continue to build on in the future.

Big thanks to Nirojan for his efforts on this wonderful initiative!  Congratulations and thanks to Google Open Source for helping to bring the open source and technical writer communities together!

Related news


  1. How To Pentest A Website With Kali
  2. Pentest Open Source
  3. Pentest Red Team
  4. Pentest Red Team
  5. Hacking Quotes
  6. Pentest Framework
  7. Pentest Linux
  8. Pentest Stages
  9. Pentest Windows

martes, 2 de junio de 2020

How To Track Iphone Without Them Knowing

Few feelings are as stomach-sinkingly awful as the thought of losing an expensive new iPhone. Whether you left it on the bus or someone slid it out of your back pocket, we put so much store in our phones that their loss leaves is saddened and angered. Most of us keep at least copies of everything in our lives on our phones, from personal conversations to emails, 


To say nothing of all our personal information and social media accounts. Of course there are security measures in place, but nobody wants to risk having all that information fall into the hands of the wrong people. In this article, I will show you how to find a phone that has been lost, whether your own phone or the phone of a friend or family member.

Can you track an iPhone without them knowing?

First off, hopefully you activated the Find My Phone feature of your iPhone when you still had it in your possession. Secondly, if your phone doesn't have service (and thus a connection to the Internet) or if you don't have iCloud set up, then these solutions are not going to work for you. Unfortunately phone technology is advanced but it isn't magical; if your phone isn't talking to the network or if you haven't turned on Find My Phone, then unfortunately the technological solution is probably not going to work. (Seriously. If you have possession of your phone(s) then stop reading this article, pick up your devices, go to Settings and select "Find My Phone" (iPhone) or "Find My Device" (Android) and make sure they are toggled on. TTjem upi cam dp ot/"

Without further ado, let's find your phone!

Can I Tell if Someone is Tracking my iPhone?


image1-3

Usually yes, if someone is using the "Find my Phone" feature, it will be displaying things on the iPhone screen. Thankfully, "Find My iPhone" comes pre-loaded on all phones with iOs 9 or newer. "Find my iPhone" is the gold standard when it comes to locating your lost iPhone. The service is integrated as part of iCloud. Here's how to use it to find your missing iPhone then track down your phone's exact location.

Step 1: Open up the "Find My iPhone" on a different device

It doesn't matter if you decide to use your iPad, your laptop, or a friend's iPhone – you can run the Find My Phone app fr0m Mac. You can use the Find my Phone app.

If you are using an Apple product like another phone or an iPad, you can simply click on the app.

If you are using a computer (even a Windows PC will work), go to icloud.com then click on the "Find iPhone" icon. Once you've clicked on the "Find iPhone" icon the website process and "Find my iPhone" app process are the same.

Step 2: Input Your Apple ID Credentials (they are the same as your iCloud info)

Since you are not using your phone, you won't be automatically logged in.

Once you log in to the app, select the "All Devices" drop-down option and then find the device that you want to locate.

Step 3: Once You Select Your Phone, Options Will Appear

As soon as you select your device on the page, iCloud will begin to search for it. If the search is successful, you will see your device on a map, pinpointing it's location. Before you sprint out the door to get it, there are some other options you should take a look at.

Once you select your device you will have three additional options in addition to seeing your phone's location. These options are playing a sound, activating "Lost Mode" and erase the phone.

Playing the sound is a great way to find your phone if you lost it somewhere around your house. If you click the option, an audio alert will go off on your phone which will hopefully help you find it. The alert will sound like a loud pinging noise alerting you that your phone is at home with you and not at the coffee shop you just visited. If you hear the pinging sound then you'll quickly find your phone by just following the sound.

When enabled, Lost Mode will lock your phone with a passcode and will display a message of your choice. This can either ensure it will be safe until you can find it, or will alert the thief what you expect of them and that you know where they are. This mode can also enable location services on your phone too.

However, if things have gone too far and you think there is a very slim chance you will ever get your device back – perhaps your phone has already crossed an international border – the best course of action is to simply erase it. Yes, this is giving up, but it also prevents your personal information getting into the hands of someone who could abuse it.

If you follow these steps, you should have your phone back in your pocket in no time. 

Is there an app to track someones phone without them knowing?

maxresdefault-11

What if you're looking for someone else's phone? I'm sorry to burst your bubble, but you are not allowed to track someone else's phone without their knowledge. While there are supposedly apps that you can install on a target's phone to track it and keep tabs on what they are doing on it, that is completely illegal and immoral. In addition to the moral issue, there is the practical fact that they could find the app which could lead to a very awkward situation, possibly one involving the police.

However, there are times when you want to find a friend's phone and you have a legitimate reason, and (the important part) they have given you permission to find it. Just as when you were looking for your own phone, there is an app that can help you find the phones of your friends and family with ease. The "Find My Friends" app used to be an extra download, but now it comes with iOS, so if your friends have ever updated their phone, they should have it.

"Find My Friends" is an app that basically allows you to share your location with others and vice versa. It can be great for keeping track of where your kids are, knowing what your significant other is doing, or just keeping tabs on your friends. It can also help them find a lost phone (as long as you have "Shared Locations" with them). Here is how to set it up:

Step 1: Open the app on your phone and the phone of the person you want to be able to share locations with.

Step 2: Click your profile in the bottom left of the screen.

Step 3: Enable "Share My Location" and make sure AirDrop is enabled on your own phone.

Step 4: From there, your friends and family will be able to search/add you to share your location with them and vice versa. You each will need to accept the "Shared Location" request from the other. Now, you can just click on their profile in the app and keep track of them.

As you likely realized while reading this article, it is a much better idea to be proactive than reactive when it comes to tracking phones. If you set up "Find My iPhone" and "Find My Friends" before your phone gets stolen or lost, it will save you a lot of potential hassle down the road. While it may be a bit worrisome to have someone be able to see your location at all times, it can really save you once your phone goes missing and you need to track it down. It is obviously best to pick someone who you trust not to take advantage of the information an app like "Find My Friends" can provide them.

No one deserves to have their phone stolen or go missing, but thankfully, there are some ways to find it, or at least have the information deleted. Hopefully, this guide helped you be able to find your phone or the phone of your friends and family, or at least prepared you for when it may happen.

If you have other ways of finding a lost phone, please share them with us below!

@EVERYTHING NT

Related word


  1. Hackintosh
  2. Pentest With Kali Linux
  3. Hacker Language
  4. Hacking Online Games
  5. Hacking Resources
  6. Hacker Attack
  7. Hacking Names