
miércoles, 13 de mayo de 2020


5 Free Online Courses To Learn Artificial Intelligence
We are living in the era of fourth industrial revolution(4IR), where Artificial intelligence has a significant role to play. This 4IR technology embedded within societies and even into the human body. From Computer enthusiasts to common people, everyone should be aware and learn this breakthrough technology.
We think about gigantic Robots from Transformers when we hear about Artificial Intelligence(AI) which is a fiction in the past but a fact today, capable of transforming the whole tech world. The field of AI consists of more than Robots such as personal assistants, self-driving cars, apprenticeship learning, behavior cloning and so on. To learn about this advanced technology, thanks to the online learning resources which offers great content to get started with artificial intelligence.
Here are the 5 free e-learning courses on Artificial Intelligence
1. UC Berkeley CS188 Intro to AI

Get started with UC Berkeley AI course, this course is absolutely for beginners who are unaware of Artificial intelligence. It doesn't need any prior computer knowledge to know about AI. UC Berkeley allows anyone to learn this course for free. This course is systematically presented and consists of the following:
- Course Schedule
- Complete sets of Lecture Slides and Videos
- Interface for Electronic Homework Assignments
- Section Handouts
- Specs for the Pacman Projects
- Source files and PDFs of past Berkeley CS188 exams
- Form to apply for edX hosted autograders for homework and projects (and more)
- Contact information
Aside from this, you can also browse the following courses as well from UC Berkeley that are part of AI course:
- Machine Learning: CS189, Stat154
- Intro to Data Science: CS194-16
- Probability: EE126, Stat134
- Optimization: EE127
- Cognitive Modeling: CogSci131
- Machine Learning Theory: CS281A, CS281B
- Vision: CS280
- Robotics: CS287
- Natural Language Processing: CS288
2. Artificial Intelligence: Principles and Techniques
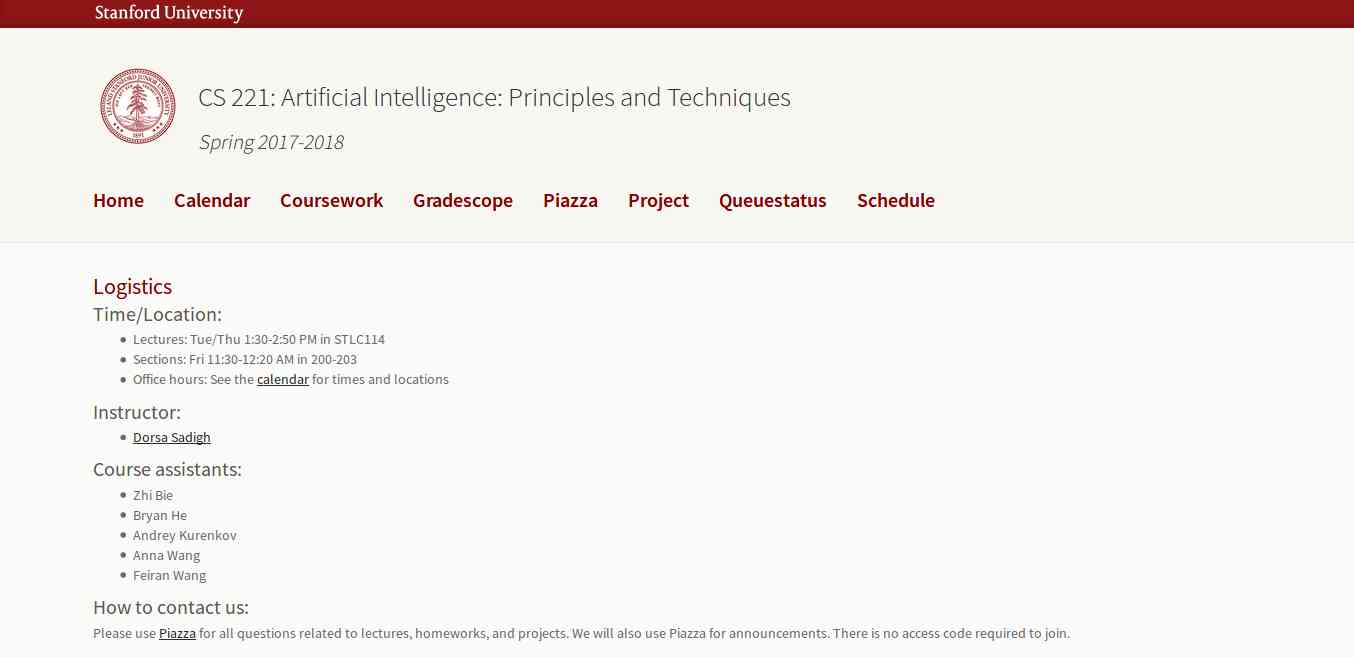
This course is offered by Stanford with great content that includes topics, videos, assignments, projects, and exams. The whole course mainly focuses on the complex real-world problems and try to find similarity between web search, speech recognition, face recognition, machine translation, autonomous driving, and automatic scheduling. Here you will learn the foundational principles of AI and implement some the AI systems. The goal of this course is to help you tackle the real-world situations with the help of AI tools. So, it is the best for the beginner to get started with AI.
3. Learn with GOOGLE AI

Who will dislike the course from Google? absolutely no one. This company is one of the early adopters of AI has a lot to offer to learners. Learn with Google AI is an education platform for people at all experience levels, it is free to access and browse content. The education resources provided by Google is from the machine learning experts of the company. These resources are the collections of lessons, tutorials, and Hands-on exercises that help you start learning, building, and problem-solving.
4. MIT 6.S094: Deep Learning for Self-Driving Cars

This course gives the practical overview of Deep Learning and AI. It is the course for beginners, also for the people who are getting started with Machine Learning. The course also offers a lot of benefits to the experienced and advanced researchers in the field deep learning. This MIT's course takes people into the journey of Deep Learning with the applied theme of building Self-Driving cars. However, the course also offers slides and videos to engage the learners.
5. Fundamentals of Deep Learning for Computer Vision

This course is offered by Nvidia and Nvidia Deep learning Institute. Computer Vision is one of the disciplines of AI that acquire, analyze, process, and understand images. The course is completely free and everyone who is enthusiast about AI can access and learn the course. It is a hands-on course that able to provide basics of deep learning and deployment of neural networks. With this. you will also learn the following:
- Identify the ingredients required to start a Deep Learning project.
- Train a deep neural network to correctly classify images it has never seen before.
- Deploy deep neural networks into applications.
- Identify techniques for improving the performance of deep learning applications.
- Assess the types of problems that are candidates for deep learning.
- Modify neural networks to change their behavior.
More articles
lunes, 11 de mayo de 2020
Wafw00F: The Web Application Firewall Fingerprinting Tool
How does wafw00f work?
To do its magic, WAFW00F does the following steps:
For further details, check out the source code on EnableSecurity's main repository.
What does it detect? WAFW00F can detect a number of firewalls, a list of which is as below:
wafw00f's installation
If you're using Debian-based distro, enter this commands to install wafw00f:
But if you're using another Linux distro, enter these commands to install wafw00f:
How to use wafw00f?
The basic usage is to pass an URL as an argument. Example:

Final Words to you
Questions? Pull up an issue on GitHub Issue Tracker or contact to EnableSecurity.
Pull requests, ideas and issues are highly welcome. If you wish to see how WAFW00F is being developed, check out the development board.
Some useful links:
Presently being developed and maintained by:
To do its magic, WAFW00F does the following steps:
- Sends a normal HTTP request and analyses the response; this identifies a number of WAF solutions.
- If that is not successful, wafw00f sends a number of (potentially malicious) HTTP requests and uses simple logic to deduce which WAF it is.
- If that is also not successful, wafw00f analyses the responses previously returned and uses another simple algorithm to guess if a WAF or security solution is actively responding to wafw00f's attacks.
For further details, check out the source code on EnableSecurity's main repository.
What does it detect? WAFW00F can detect a number of firewalls, a list of which is as below:
wafw00f's installation
If you're using Debian-based distro, enter this commands to install wafw00f:
sudo apt update && sudo apt install wafw00fBut if you're using another Linux distro, enter these commands to install wafw00f:
How to use wafw00f?
The basic usage is to pass an URL as an argument. Example:
Final Words to you
Questions? Pull up an issue on GitHub Issue Tracker or contact to EnableSecurity.
Pull requests, ideas and issues are highly welcome. If you wish to see how WAFW00F is being developed, check out the development board.
Some useful links:
Presently being developed and maintained by:
- Sandro Gauci (@SandroGauci)
- Pinaki Mondal (@0xInfection)
More info
Scanning TLS Server Configurations With Burp Suite
In this post, we present our new Burp Suite extension "TLS-Attacker".
Using this extension penetration testers and security researchers can assess the security of TLS server configurations directly from within Burp Suite.
The extension is based on the TLS-Attacker framework and the TLS-Scanner, both of which are developed by the Chair for Network and Data Security.
You can find the latest release of our extension at: https://github.com/RUB-NDS/TLS-Attacker-BurpExtension/releases

Furthermore, the extension allows fine-tuning for the configuration of the underlying TLS-Scanner. The two parameters parallelProbes and overallThreads can be used to improve the scan performance (at the cost of increased network load and resource usage).
It is also possible to configure the granularity of the scan using Scan Detail and Danger Level. The level of detail contained in the returned scan report can also be controlled using the Report Detail setting.
Please refer to the GitHub repositories linked above for further details on configuration and usage of TLS-Scanner.

This is a combined work of Nurullah Erinola, Nils Engelbertz, David Herring, Juraj Somorovsky, Vladislav Mladenov, and Robert Merget. The research was supported by the European Commission through the FutureTrust project (grant 700542-Future-Trust-H2020-DS-2015-1).
If you would like to learn more about TLS, Juraj and Robert will give a TLS Training at Ruhrsec on the 27th of May 2019. There are still a few seats left.
Using this extension penetration testers and security researchers can assess the security of TLS server configurations directly from within Burp Suite.
The extension is based on the TLS-Attacker framework and the TLS-Scanner, both of which are developed by the Chair for Network and Data Security.
You can find the latest release of our extension at: https://github.com/RUB-NDS/TLS-Attacker-BurpExtension/releases
TLS-Scanner
Thanks to the seamless integration of the TLS-Scanner into the BurpSuite, the penetration tester only needs to configure a single parameter: the host to be scanned. After clicking the Scan button, the extension runs the default checks and responds with a report that allows penetration testers to quickly determine potential issues in the server's TLS configuration. Basic tests check the supported cipher suites and protocol versions. In addition, several known attacks on TLS are automatically evaluated, including Bleichenbacher's attack, Padding Oracles, and Invalid Curve attacks.

Furthermore, the extension allows fine-tuning for the configuration of the underlying TLS-Scanner. The two parameters parallelProbes and overallThreads can be used to improve the scan performance (at the cost of increased network load and resource usage).
It is also possible to configure the granularity of the scan using Scan Detail and Danger Level. The level of detail contained in the returned scan report can also be controlled using the Report Detail setting.
Please refer to the GitHub repositories linked above for further details on configuration and usage of TLS-Scanner.
Scan History
If several hosts are scanned, the Scan History tab keeps track of the preformed scans and is a useful tool when comparing the results of subsequent scans.

Additional functions will follow in later versions
Currently, we are working on integrating an at-a-glance rating mechanism to allow for easily estimating the security of a scanned host's TLS configuration.This is a combined work of Nurullah Erinola, Nils Engelbertz, David Herring, Juraj Somorovsky, Vladislav Mladenov, and Robert Merget. The research was supported by the European Commission through the FutureTrust project (grant 700542-Future-Trust-H2020-DS-2015-1).
If you would like to learn more about TLS, Juraj and Robert will give a TLS Training at Ruhrsec on the 27th of May 2019. There are still a few seats left.
More articles
Evil Limiter: Taking Control Of Your Network Bandwidth

Ever wanted to block someone from the network or limit their bandwidth without having the network admin privileges? Well Evil Limiter has got you covered then.
An amazing tool to help you control your network without having access to the admin panel.
Today I'm gonna show you how to use this interesting tool to take control of your network.
Requirements:
1. A PC or Laptop with Linux OS.2. A Network Adapter.
3. Access to the Network you want to control.
4. sudo or root access on your Linux OS.
First of all we will download the tool from its github repository:
https://github.com/bitbrute/evillimiter
You can download and extract the zip file from the link above or you can clone evillimiter repository using git like this:
git clone https://github.com/bitbrute/evillimiter
Now lets install the downloaded tool on our machine
Step 1: Move inside the downloaded github repository
cd evillimiter
Step 2: To install type
sudo python3 setup.py install
wait for the installation to finish (May take some time)
Step 3: To run type
sudo evilimiter
Voila! That's it, you got it up and running on your machine
Now how do you control your network with it, its very easy.
It should detect your network automatically but yeah you can set it up manually as well using the command line argument -i.
After you have selected the right interface to control, you need to scan your network for live hosts. To perform the scan type
scan
you can pass an optional flag to the scan command which is range which will help you to specify the range of ip addresses you want to scan like this
scan --range 192.168.1.1-192.168.1.100

The above command will scan a total of 100 hosts from 192.168.1.1 to 192.168.1.100
Now after you have scanned your network next thing is to list the hosts that have been discovered during the scan for that you type the hosts command like this
hosts

Now you know the hosts on your network and now you should know which host you wanna block or limit based on the mac address of the host. Remember the host id of the host that you want to block or limit bandwidth of and lets do the magic.
to block a host from using the internet we simply specify the block command followed by the host id of the host that we want to block like this
block 1

if instead of blocking the host we just want to limit his internet bandwidth we can do just that by using the limit command followed by the host id and then the bandwidth that we want to allocate to that particular host like this
limit 1 100kbits

Wohooo! yeah its that easy and yes you can do all this without having the network admin role.
Now if you want to show mercy on that poor guy (blocked host), you can set him free by using the free command followed by the host id like this:
free 1

Well isn't administrating your network bandwidth so easy now.
Hope you enjoyed this tutorial.:)
How To Repair A Crashed SD Card And Protect Your Data
One of the many reasons users prefer Android devices is the ability to expand the amount of available storage space using the MicroSD Card. Since we have the ability add up to 256GB of external storage to Android devices today, you're bound to choke up when the SD card crashes without any tell-tale signs.
If you're experiencing issues on how to repair a crashed SD card on your Android device, there are certain fixes you can try out. Since there's not a singular solution to SD Card issues, we've created a guide to help you detect the issue with your external storage and mentioned multiple solutions to get your SD card working and even retrieve your stored data along with it.

Before you start
Before you start
Don't format the card if you want to retain any of the photos on it. You can follow the tips in our separate article on how to format a write-protected SD card after you've tried to recover any files that are on your card.
Now, try and find a different card reader. If you've inserted an SD card into your laptop or PC's built-in slot and nothing happens, try using a different computer or a USB card reader.
Read More;- Hacking Gmail For Free Custom Domain
Sometimes it's the reader at fault – not the card. You can buy a USB SD card reader online for just a couple of pounds which will accept both microSD and standard SD cards.
Steps to Repair a Crashed SD Card and Protect your Data:
Step 1 – Physically clean the SD Card

Despite being durable and built to last, SD cards are prone to crashing sometimes due to physical damage. Since you carry your phone around everywhere, some dirt and dust are bound to fill up in the cracks, that can make SD card stop working from time to time.
The first thing you can try to do on how to repair a crashed SD card is physically scrub and clean it.
- Remove the MicroSD card from your Android device and place it on a clean surface. Make sure that you turn off your phone before pulling out the SD card for safety.
- Flip the MicroSD card and using a white eraser, gently scrub the gold contact pins of the SD card to get rid of any residual dirt or grime.
- If you have an alcohol-based cleaning solution or even nail polish remover around, dab it on to the connector pins using a Q-tip and gently rub it.
Once the SD card has dried out, you can plug it back into your Android device and turn it on to see if the solution has worked.
Also Read;- How To Get Grammarly Premium Account Free 2018
Step 2 – Format the SD Card

If your SD card is being detected by the Android device but you're having trouble accessing the saved files, there's a good chance that the files are corrupt. This could either be due to a particular broken file in the saved storage, or a virus that is causing the issue.
Either way, the only option there is left for you to try out is make the SD card reusable for formatting it.
- From the home screen of your Android device, head over to the Settings app and then scroll down to find the Storage
- In the Storage tab, you'll be able to find the Erase SD Card option, so go ahead and select it.
- Confirm your action to delete all of the files and folders stored on your SD card and this should effectively solve the issue.
Step 3 – Check the SD card compatibility
If you are trying to figure out how to repair a crashed SD card on an older Android device, you might just need to look at the details more carefully. If your SD card fails to be recognized on the mobile device but works with your computer, the problem could be related to compatibility.
Also Read;- How To Install and Run Backtrack On Android
- If the MicroSD card that you are trying to use with your older phone is SDXC version (built for higher transfer speeds), it will not be recognized.
- Look up the maximum capacity of expandable storage that is supported by your device, since they can vary from starting at 64GB to all the way up to 256GB.
Step 4 – Diagnose the SD card using a PC

If a simple format did not help you solve the SD card problem, you might need a more technical analysis of the issue. To do so, you can plug in your SD card into a computer and use the diagnostic tools to find out the pertaining errors and effectively fix them.
- Connect your Android mobile device to a computer using a USB cable.
- Make sure that you connect Android as MSC (Mass storage mode) and not MTP (Media transfer mode). You can do this using the notification menu once you connect the phone to your computer.
- Launch the Windows Explorer and right click on the SD card driver you see on the screen. In the options menu, choose Properties – Tools – Error Checking and wait for the entire process to complete.
- The computer will try to update the software for your SD card and fix any errors that are causing it to crash.
Step 5 – Use chkdsk to fix/repair a corrupted SD card without data loss
The "chkdsk" command is your first choice for damaged SD card repair. Requiring no format, it allows you to fix or repair a corrupted SD card and regain access to all your important files on the device. Let's see how it works. (I'm using Windows 7 for this demonstration)
1. Plug in your SD card to your computer with a card reader.
2. Go to the start menu, type in "cmd" in a search bar, hit enter and then you can see something named "cmd. exe" in a list of programs.
3. Right-click "cmd. exe" and then you will get the following command windows that allow you to fix your corrupted SD card without formatting.
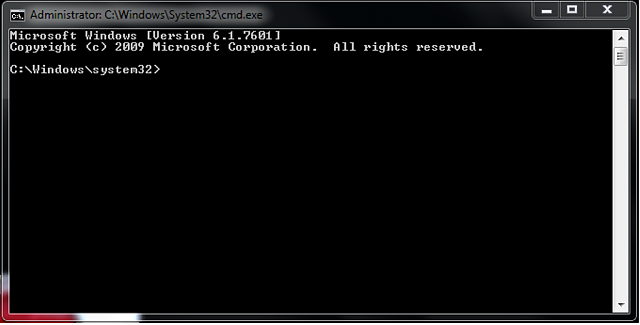
4. Type in "chkdsk /X /f sd card letter:" or "chkdsk sd card letter: /f ", for example,"chkdsk /X /f G:" or "chkdsk h: /f".
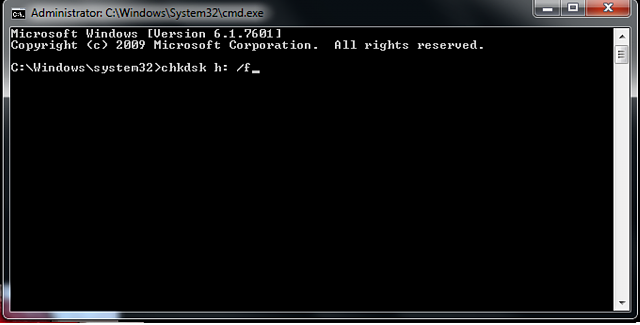
After finishing all the steps, Windows will have checked and fixed the file system of the SD card. It usually takes several minutes. After that, if you see "Windows has made corrections to the file system" in the command window, then congratulations! The damaged SD card is successfully fixed and you can see your data again. If not, you should try a third-party data recovery software to retrieve your files from the damaged SD card and repair it by formatting.
Once the process has been completed, you can go ahead and pop the SD card back into your Android device and see if the issue has been resolved.
Step 6 : Use EaseUS Data Recovery Wizard to recover data from damaged SD card
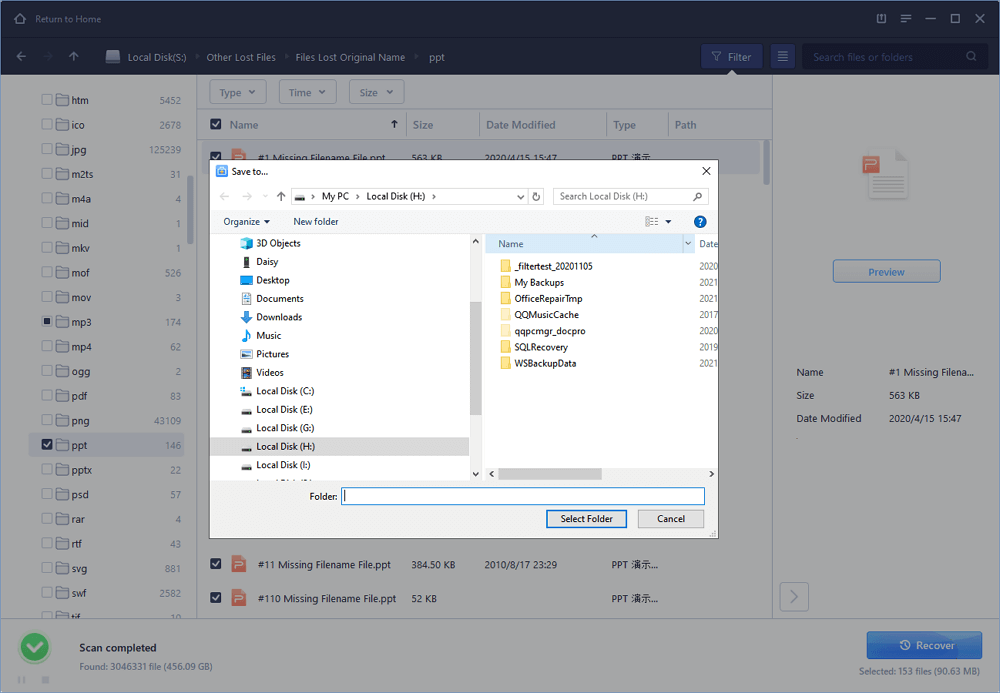
1. Connect the corrupted SD card to your PC, launch EaseUS's data recovery software, select the card and click "Scan".
2. A quick scan will first start to search all the lost and existing data on the SD card. And after that, a deep scan will automatically launch in order to find more files.
2. A quick scan will first start to search all the lost and existing data on the SD card. And after that, a deep scan will automatically launch in order to find more files.
3. After the scan, choose those files you want to recover and click the "Recover" button to retrieve them back.
Final Words :
So finally through this article, you have got to know about the method by which the SD card could be repaired and hence the data in it could be saved for the further access. We have tried to present the method in easy to grab manner and we believe that you could possibly get to know about it easily. Hope that you would have liked the information in this post, if it is so then please share it with others. Also, do not forget to share the post with others, let most of the people know about the method. Share your comments about the post through using the comment box below. At last never the fewer thanks for reading this post!
Related posts
RenApp: The Ultimate File Renaming App

Are you tired of managing your tens of thousands of files like jpgs, pngs, or others and you want a way to manage them as quick as possible then RenApp is solution for all problem.
RenApp lets you change names of many files of a particular type to a common name with added numbering. So no more time wasting in file management just four clicks and your files will be ordered.
Beside that RenApp can clean your folders and subfolders from backup files of .bak or .*~ extension. Removing backup files in order to make space available manually is a tedious work and can take lots of time but why do it that we've got RenApp just locate the folder and click remove it'll remove them all from that folder and its subfolders.
Some of the features of RenApp are as:
- Rename files to a common name.
- Rename files of different extensions to a common name in one shot
- Remove backup files from folder and subfolders.
R RenApp is free and Opensource, written in Python with QT interface. Check out the source code at sourceforge.
Read more
- Curso Ethical Hacking
- Hacking Life
- Hacker Definicion Informatica
- Hacking Bluetooth Speaker
- Raspberry Hacking
- Hacking Team
- Funnel Hacking Live
- Hacking Traduccion
- Hacking Y Forensic Desarrolle Sus Propias Herramientas En Python Pdf
- Defcon Hacking
- Certificacion Hacking Etico
- Growth Hacking Tools
- Servicio Hacker
- Que Hace Un Hacker
- Hacking Y Forensic Desarrolle Sus Propias Herramientas En Python Pdf
- Libro Hacker
Suscribirse a:
Entradas (Atom)